Build a Simple Networking Library in Android (Part 2)
In Part 1, of this series of article, I discussed how to create a library module. We created a Simple Networking Library naming our module simple-networking. We accomplished it!
Now is a good time to use our library module in a demo/test app. This article is all about how to publish a Library in your Machine (locally), and I’m using the Library developed in Part 1 as the reference. Here we will discuss, how to locally publish our module.
If you have skipped over Part 1 and only want to learn how to locally publish then you can use the module code mentioned below, even if you have some different module and want to publish that locally then also this article will help you.
Http: This class helps in making a connection request, parsing the response, thread switching to the background for making the request. And lastly, give the response back to the user.ThreadExecutor: This class makes a handler thread for background threading, used by theHttpclass.JSONObjectListener: The interface to give the response back to the user.
Before starting to locally publish our module, we will make sure that our library is working.
1st Step: Just make it work :)
Before publishing locally we will aim to make our module working. If you see the image below I have an app module and a simple-networking module. First, we will try running our library in the app module.

But why the app module though?
It can be actually any module in the same project which can generate an APK for us. As a library module can only be integrated into an application where it will run.
a) Let’s Integrate the module now
To integrate the simple-networking module in an app. We will have to add the line app/build.gradle in the dependencies section
dependencies {
    implementation project(":simple-networking")
}
Click Sync Project with Gradle Files now. In this example above, the implementation configuration adds the library named simle-networking as a build dependency for the entire app module. Once the Gradle Sync operation is complete, we can use simle-networking in our app.
b) Using the simple-networking module
If you have followed Part 1, then I mentioned in the starting that our module will expose something like this below, you can skip this if you have your own library
It is simple GET request with our library we made. There is another request also possible with headers, body and other HTTP methods like POST, PUT etc. but they are omitted for simplicity.
If the above can compile successfully and run in the APK, then we are good to go. If you run into any difficulty I suggest you look again at the code provided at the start. Now if it’s all good we can focus on local publishing!
2nd Step: Local Publish
We started with implementing the entire module in our app. Now we will focus on how to make a local release. A local release is something that will be on your PC. It gives an edge in testing/running the library in any android app related project we open in Android Studio. Normally libraries are present in maven repository and we use them in our project as they are hosted there. But to make something like that we should first make sure it tested for release. To mock the same on our PC, there is something known as mavenLocal and we can use our libraries directly like this:
implementation 'com.example:any-library:a.b.c'To achieve this we have 5 steps:
Steps 1: Enable mavenLocal repositories into your build system. To do that we need to add below in your root levelbuild.gradle file.
Step 2: Create a file named install.gradle in your library module. (Can be named with any name, just make sure it has .gradle extension)
Step 3: Add the code to publish our lib. locally in install.gradle , to make it simpler we are only going to publish our release build-variant. If you want to learn more build-variants, check here. The below code will enable our project to make it maven published.
- afterEvaluate: According to Gradle documentation it is a listener that gets notified when the build file belonging to this project has been executed.
- publishing: Will enable the functionality to alter how we want to publish. Basically, it opens a block for us where we can give parameters on what we want to change in our library
- publication: Opens a block where we can define publication i.e. in our different build-variants to be released.
- release (MavenPublication): It tells that we are going to focus on release type build-variants.
- groupId: While integrating any library one might have encountered something like
implementaion 'com.example:any-lib:a.b.c'herecom.exampleis groupId. Usually, the package name is taken. - artifactId: In
implementaion 'com.example:any-lib:a.b.c'hereany-libis artifactId. - version: If you have ever integrated any library then you might have encountered something like
implementaion 'com.example:any-lib:a.b.c'herea.b.cis version.
Step 4: Currently, our install.gradle is just an independent file. Now we need to apply install.gradle in our library module’sbuild.gradle , add the below in build.gradle
apply from: 'install.gradle'Step 5: Add the following inbuild.gradle , adds the plugin support for maven-publish.
plugins {
   id 'maven-publish'
}
If we have gone through all the 5 steps carefully then we now need to click Sync Project with Gradle Files. It will add the functionality of local maven publish for us. A ‘Gradle’ button on the right side. In the Gradle sub-section we have to navigate to library-module>Tasks>publishing>publishToMavenLocal, see the picture below:
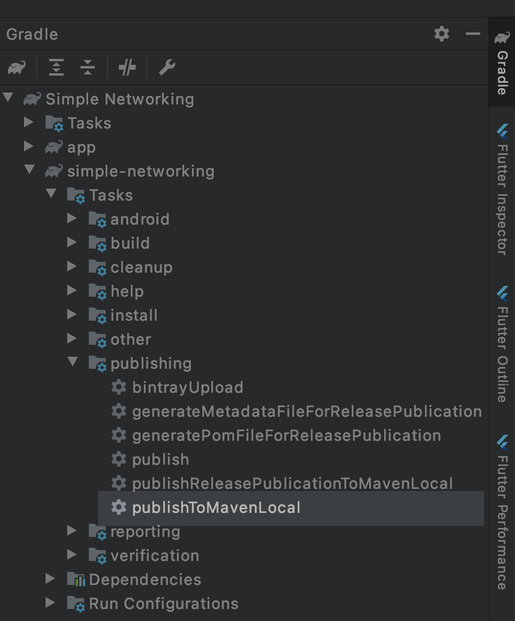
Now we can click on publishToMavenLocal to generate a local library. Let’s double click. After this, it should generate a library on local.
How to verify that the library is generated?
A library is nothing but an aar and it is hidden ~/.m2/repository/ folder, as shown below:

You can navigate to the folder to see that our aar has been generated or not. After this now we can use the library in our android project.
dependencies {
    //implementation project(":simple-networking") remove this now
    implementation 'com.simple.networking:http:1.0.0'
}
We can now remove implementation project(":simple-networking") as we will now use the published one. Sync Project with Gradle Files now. The lib. will be used in the same way as it was with the module.